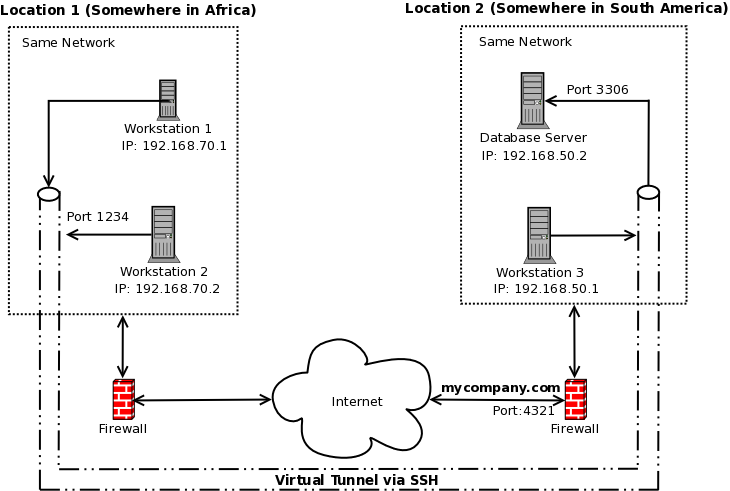
Blogs
Problem
Workstation 1 needs to connect to Database Server located at another part of the globe.Prerequisites
• Workstation 1 and Workstation 2 are on the same network.• Workstation 3 and Database Server are on the same network.
• Workstation 2 can connect to Workstation 3 via SSH.
• Port 4321 at mycompany.com is forwarded to port 22 of Workstation 3.
• Workstation 2 does not have a firewall which allows Workstation 1 to connect to it.
• Database Server allows connection from Workstation 3.

Solution
Create an SSH tunnel using Workstation 2 and Workstation 3 where Workstation 1 connection can pass through going to Database Server.Steps:
1. Go to Workstation 2 and make sure it can connect to Workstation 3 by issuing the following commands:[user1@Workstation2 ~] ssh user1@mycompany.com -p 4321
user1@mycompany.com's password:
Last login: Mon Feb 21 21:55:54 2011 from Workstation2
[user1@Workstation3 ~] exit
[user1@Workstation2 ~]
If you can do the above, then we are set to do tunneling.
2. Still on Workstation 2 issue the following command:
[user1@Workstation2 ~] ssh -f user1@mycompany.com -p 4321 -L 192.168.70.2:1234:192.168.50.2:3306 -N
user1@mycompany.com's password:
[user1@Workstation2 ~]
We will define each one of the parameters:
-f
This tells ssh to go to background just before command execution.
user1@mycompany.com
This defines your username and address of the remote computer.
-p 4321
This is the port in the firewall where in it is being forwarded to port 22 of Workstation 3. If your firewall is on Workstation 3, then this parameter can be omitted.
-L 192.168.70.2:1234:192.168.50.2:3306
This is where the magic happens. -L means you want a local (Workstation 2) port to be forwarded to a remote host (Database Server) and port (3306) on the remote side (Workstation 3). Just to be clear, local side pertains to the computer network at Africa while remote side pertains to the computer network at South America.
The bunch of numbers after -L can be separated by colon(:) and here are their meanings:
192.168.70.2 is the address of the local computer (Workstation 2).
1234 is the port on the local computer (Workstation 2).
192.168.50.2 is the address of the remote computer (Database Server) on the remote side.
3306 is the port to access in the remote computer.
-N
This means that you cannot execute a command on the remote host since your are only tunneling data. This is basically for security.
Once you have issued the above command and entered your password, the ssh connection will go in the background. The tunnel is now created.
3. To use the tunnel, we go to Workstation 1 and execute mysql:
[user1@Workstation1 ~] mysql -h 192.168.70.2 -P 1234 -u dbuser -pdbpasswd dbname
That's all there is to it. Workstation 1 is now connected to Database Server.
This time I'll make ssh login even easier by using a config file.
Instead of typing ssh with different arguments plus the long domain name or IP address and user name, you'll just need to type the command "ssh myserver".
Using our example from my previous blog, open console and run the following command:
[happy@mars ~] vim .ssh/config
Hit 'i' and type in the following:
Host jup
User happy
HostName jupiter
Hit esc button then type ':x" to save.
You can now just type:
[happy@mars ~] ssh jup
SSH command will read your config file and match up 'jup' from the Host in your config and use the User and Hostname to connect to another computer.
This is very useful, especially if you have many servers that you manage and have different usernames and parameters when connecting.
You can set all possible parameters for ssh in the config file instead of typing them one by one.
Examples are Port if the other computer uses a port other than 22, ForwardX11 to display GUI on your local computer, Protocol to force ssh protocol version, Tunnel for tunneling and many others. Type "man ssh_config" in your console to get more in depth information about possible parameters.
In this example scenario, let's call your local computer "mars" with user happy. We'll call the remote server "jupiter" with user happy (this can be any user in jupiter).
First in mars, fire up the console type the following command:
[happy@mars ~] ssh-keygen
You will be asked to specify where the key should be saved and optionally add a passphrase (aka password). Just hit enter key on those question. No need to enter a passphrase because it will beat our purpose.
The command will produce 2 files in /home/happy/.ssh folder. A private key which is used by the ssh program when connecting to remote hosts and a public key which needs to reside in the remote hosts.
We will now need to send the public key to the remote hosts.
[happy@mars ~] scp .ssh/id_rsa.pub happy@jupiter:/home/happy/
You will be asked for your password and if successful your public key will be transferred to the remote server.
We now need to tell the remote server that that public needs to be trusted.
[happy@mars ~] ssh happy@jupiter
happy@jupiter's password:
[happy@jupiter ~] mkdir .ssh
[happy@jupiter ~] cat id_rsa.pub >> .ssh/authorized_keys2
[happy@jupiter ~] rm -f id_rsa.pub
[happy@jupiter ~] chmod -R 700 .ssh
TIP: If you have the same username in the local and remote server, you can omit the "happy@" when doing ssh command.
This may be the last time you will be typing your password. The first command will get you inside the remote server as you usually do. The second one copies your public key into the authorized_keys2 file. The third one deletes your public key. Lastly, the fourth command sets the authorized_keys2 permission correctly (you only need to do this once).
You are now set to password-less logins. Exit the remote server and try logging in again. It should not ask for your password any more.
These steps are done on Fedora 9. Other versions of Fedora (or other flavours of Linux) may still work but paths may be different.
On this example, we'll be running the new apache instance with user ian on port 8080.
First step is to duplicate the necessary files:
[root@linux ian]# cp -fR /etc/httpd /etc/httpd-ian
[root@linux ian]# cp /usr/sbin/httpd /usr/sbin/httpd-ian
[root@linux ian]# cp /usr/sbin/apachectl /usr/sbin/apachectl-ian
Create a new directory which the new instance of apache will be serving.
[root@linux ian]# mkdir /home/ian/www
Edit the files using any text editor. I'll be using vim in this example.
[root@linux ian]# vim /etc/httpd/conf/httpd.conf
Replace PidFile from run/httpd.pid to run.httpd-ian.pid
Replace Listen Port from 80 to 8080
Replace all occurences of /var/www/html to /home/ian/www
Replace User from apache to ian
Replace Group from apache to ian
[root@linux ian]# vim /usr/sbin/apachectl-ian
Replace HTTPD from '/usr/sbin/httpd' to '/usr/sbin/httpd-ian -f /etc/httpd-ian/conf/httpd.conf'
Replace STATUSURL from 'http://localhost:80/server-status' to ="http://localhost:8080/server-status"
We are now ready to start a new apache instance.
[root@linux ian]# /usr/sbin/apachectl-ian start
One line find and replace
find . -name '*.txt' -print0 |xargs -0 perl -pi -e 's/find/replace/g'
*.txt - files to find
find - pattern to find
replace - replace found pattern
Have you ever tried importing large MySQL backup files via PHPMyAdmin? If yes, you would probably have experienced timeout errors, and PHPMyAdmin will tell you to reload the page... but the same thing happens again.
Solution is use the mysql command line to restore your backup files.
Here's the command:
mysql --user=myuser mydatabase < mybackupfile.sql
You would be surprised at how fast your backup file is restored!


